Showing short video clips during virtual teaching can be beneficial. The trick is to ensure that you have an activity planned around a video that will keep your students actively engaged. This idea offers opportunities for students to interact, make observations, and apply new learnings while watching a video during virtual learning.
It is also important to have a clear purpose for showing a video clip. You will want to explicitly communicate the purpose by informing students what they should be looking for and what/how they will be asked to share during or after viewing.
In a face-to-face classroom, you can monitor whether or not your students are attending to the screen, but as is frequently acknowledged on this site, being “on task” is not good enough. We want our students to be actively engaged. But what about virtual teaching? How can we monitor student attention?
As follows is a great activity to keep your entire class actively engaged and learning while they view a video clip on a virtual platform.
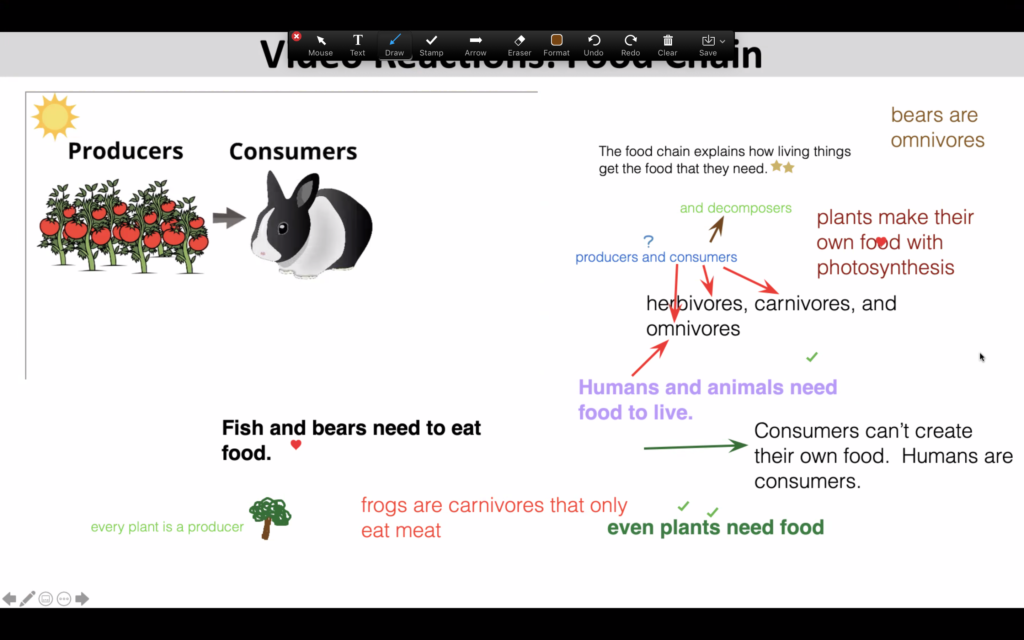
First, you will need to embed a short video into your slide deck. Next, you should enable annotation tools so that students can offer observations while viewing. The screenshot below shows an embedded video about food chains in the upper left corner. You will note that students have used annotation tools such as text, stamps, and arrows to comment on what they were watching.
Why is this a great idea?
Simply put, this provides an opportunity for your entire class to be actively engaged during your lesson. Rather than just asking one student at a time to share a reaction to the video, everyone has the option to simultaneously interact with content and offer their thoughts.
Also, videos can be great teaching tools for many students who benefit from visual input. Asking students to annotate their thoughts ensures that the time spent watching a brief video clip is beneficial to all.
How can I do this during my virtual teaching?
There are actually 2 things to cover:
- How to find and embed video clips into your slide deck.
- How to allow students to use annotation features so that they can respond to your video clip.
1. How to find and embed video clips into your slide deck:
The description and video below walks you through embedding videos in PowerPoint. You will learn how to embed a video that is saved to a folder on your computer and a video that is housed on an online site such as YouTube.
*Here is a helpful blog post for those who wish to embed video in Google Slides.
To embed a video that is saved to your computer, open your PowerPoint presentation and click on the Insert tab at the top of your screen. Next, select Video, followed by Movie from File. You will now be prompted to select a file that is saved to your computer. Once you find the file and click Insert, your video will be inserted into your PowerPoint presentation.
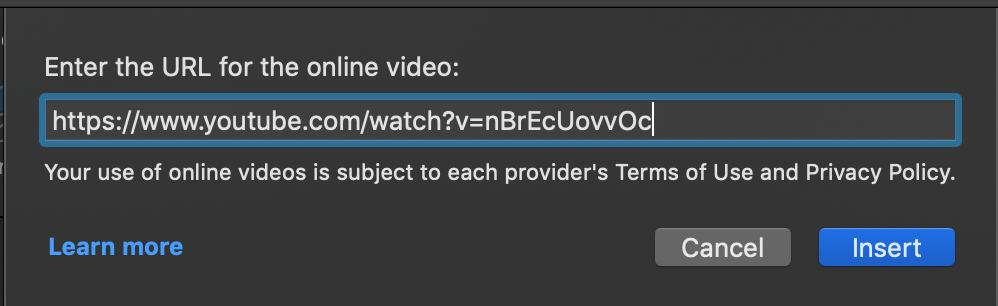
To embed a video that is online, go to a site such as YouTube and open your desired video. Copy the URL for the video. Next, you will open your PowerPoint presentation, click on Insert, select Video, followed by Online Movie. You will then be prompted to paste your chosen video’s URL into the box. Click Insert and your video will be inserted into your PowerPoint presentation.
*Please note that some online videos may restrict your ability to embed them.
Once you activate your PowerPoint presentation, you should be able to access controls including play, pause, volume, and closed captioning.
How to allow students to use annotation features during virtual teaching:
I will demonstrate how to you the annotation tools offered by Zoom. Several other popular platforms also offer annotation tools.
Open your Zoom meeting. As the host, you will be able to click on Share Screen. From there, select Desktop. Be aware that, at this point, your class will be able to see everything on your screen.
Encourage students to look toward the top of their screen, select View Options, and then click on Annotate.
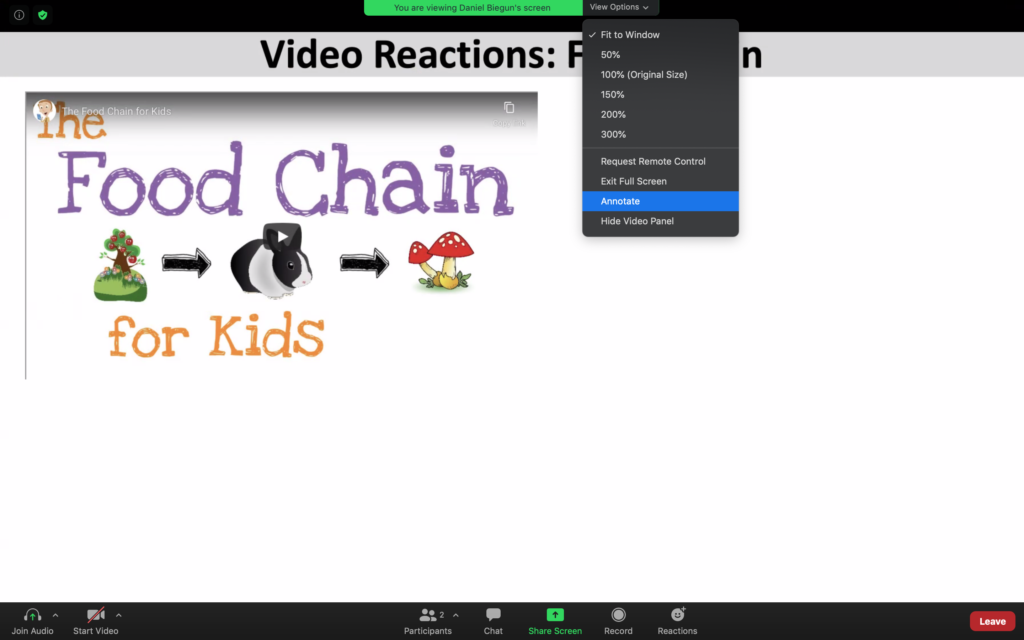
From there, the annotation toolbar will appear, which includes useful options such as text, stamp, and draw. (Note: You, as the host, will automatically have Annotate in your toolbar.) Students can type comments and observations while watching the video.

This is not the time to worry about spelling or grammar. Allow students the freedom to respond with words, phrases, sentences, Emojis, or doodles. The purpose is to ensure that all students are actively engaged during the video clip.
Extension Ideas
In the example above, the students were simply asked to annotate their observations during the video. Such wide-open prompts may work for some students. For others, you might want to drill down and ask for more specific observations. Here are a few examples:
- Indicate one new thing that you learned from the video.
- Type a vocabulary word from this unit that you recognized in the clip.
- Summarize this video with one sentence.
- Share something that surprised you.
- What is the main idea of this clip?
Getting all students to respond to videos during virtual teaching is easy. You can ask students to annotate their responses on screen while the video is playing or give them some time afterward. You can also encourage them to use the stamp annotation tools such as the check mark, arrow, or heart to affirm their classmates’ responses.
Have fun with this idea, knowing that you can share engaging video clips while allowing your entire class to participate throughout. If they are actively engaged, then they are most likely learning.
Happy teaching!