Annotation Tools, including the Stamp Tool, on Zoom and other virtual platforms tend to be underutilized. These tools can be very powerful and versatile. The greatest benefit is that they allow all students to be actively engaged in learning at all times. If we rely on the traditional model of calling on one student at a time to give a response, then it is likely that the rest of the class is checking out.
Below you will find 7 examples of how teachers and trainers have used the stamp tool to engage audiences and yield great data. In Zoom, your Annotation Toolbar gives you the option to save a screenshot to your desktop. Be sure to save your work before clearing the screen and moving on.
How do I access the annotation tools?
I will show you how students can access the Annotation Tools in Zoom. Several other virtual platforms also offer similar tools.
The first step is to share your screen. Students cannot access their annotation tools unless the host (teacher/trainer) has shared their screen. Once you have shared your screen, prompt your audience to select the View Options dropdown and then click on Annotate.
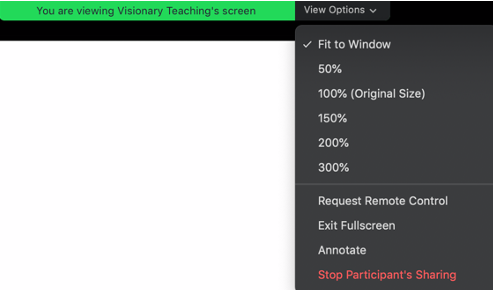
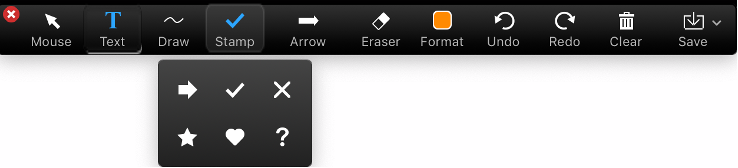
Your audience should now see the toolbar below. Individuals can click on Stamp and then select one of the stamp options (arrow, check, etc.) From there, people need only move their cursor to the portion of the screen that they want to stamp and then left click with their mouse.
Here are a few great examples of how teachers and trainers have used the stamp tool with students:
Interacting with Maps
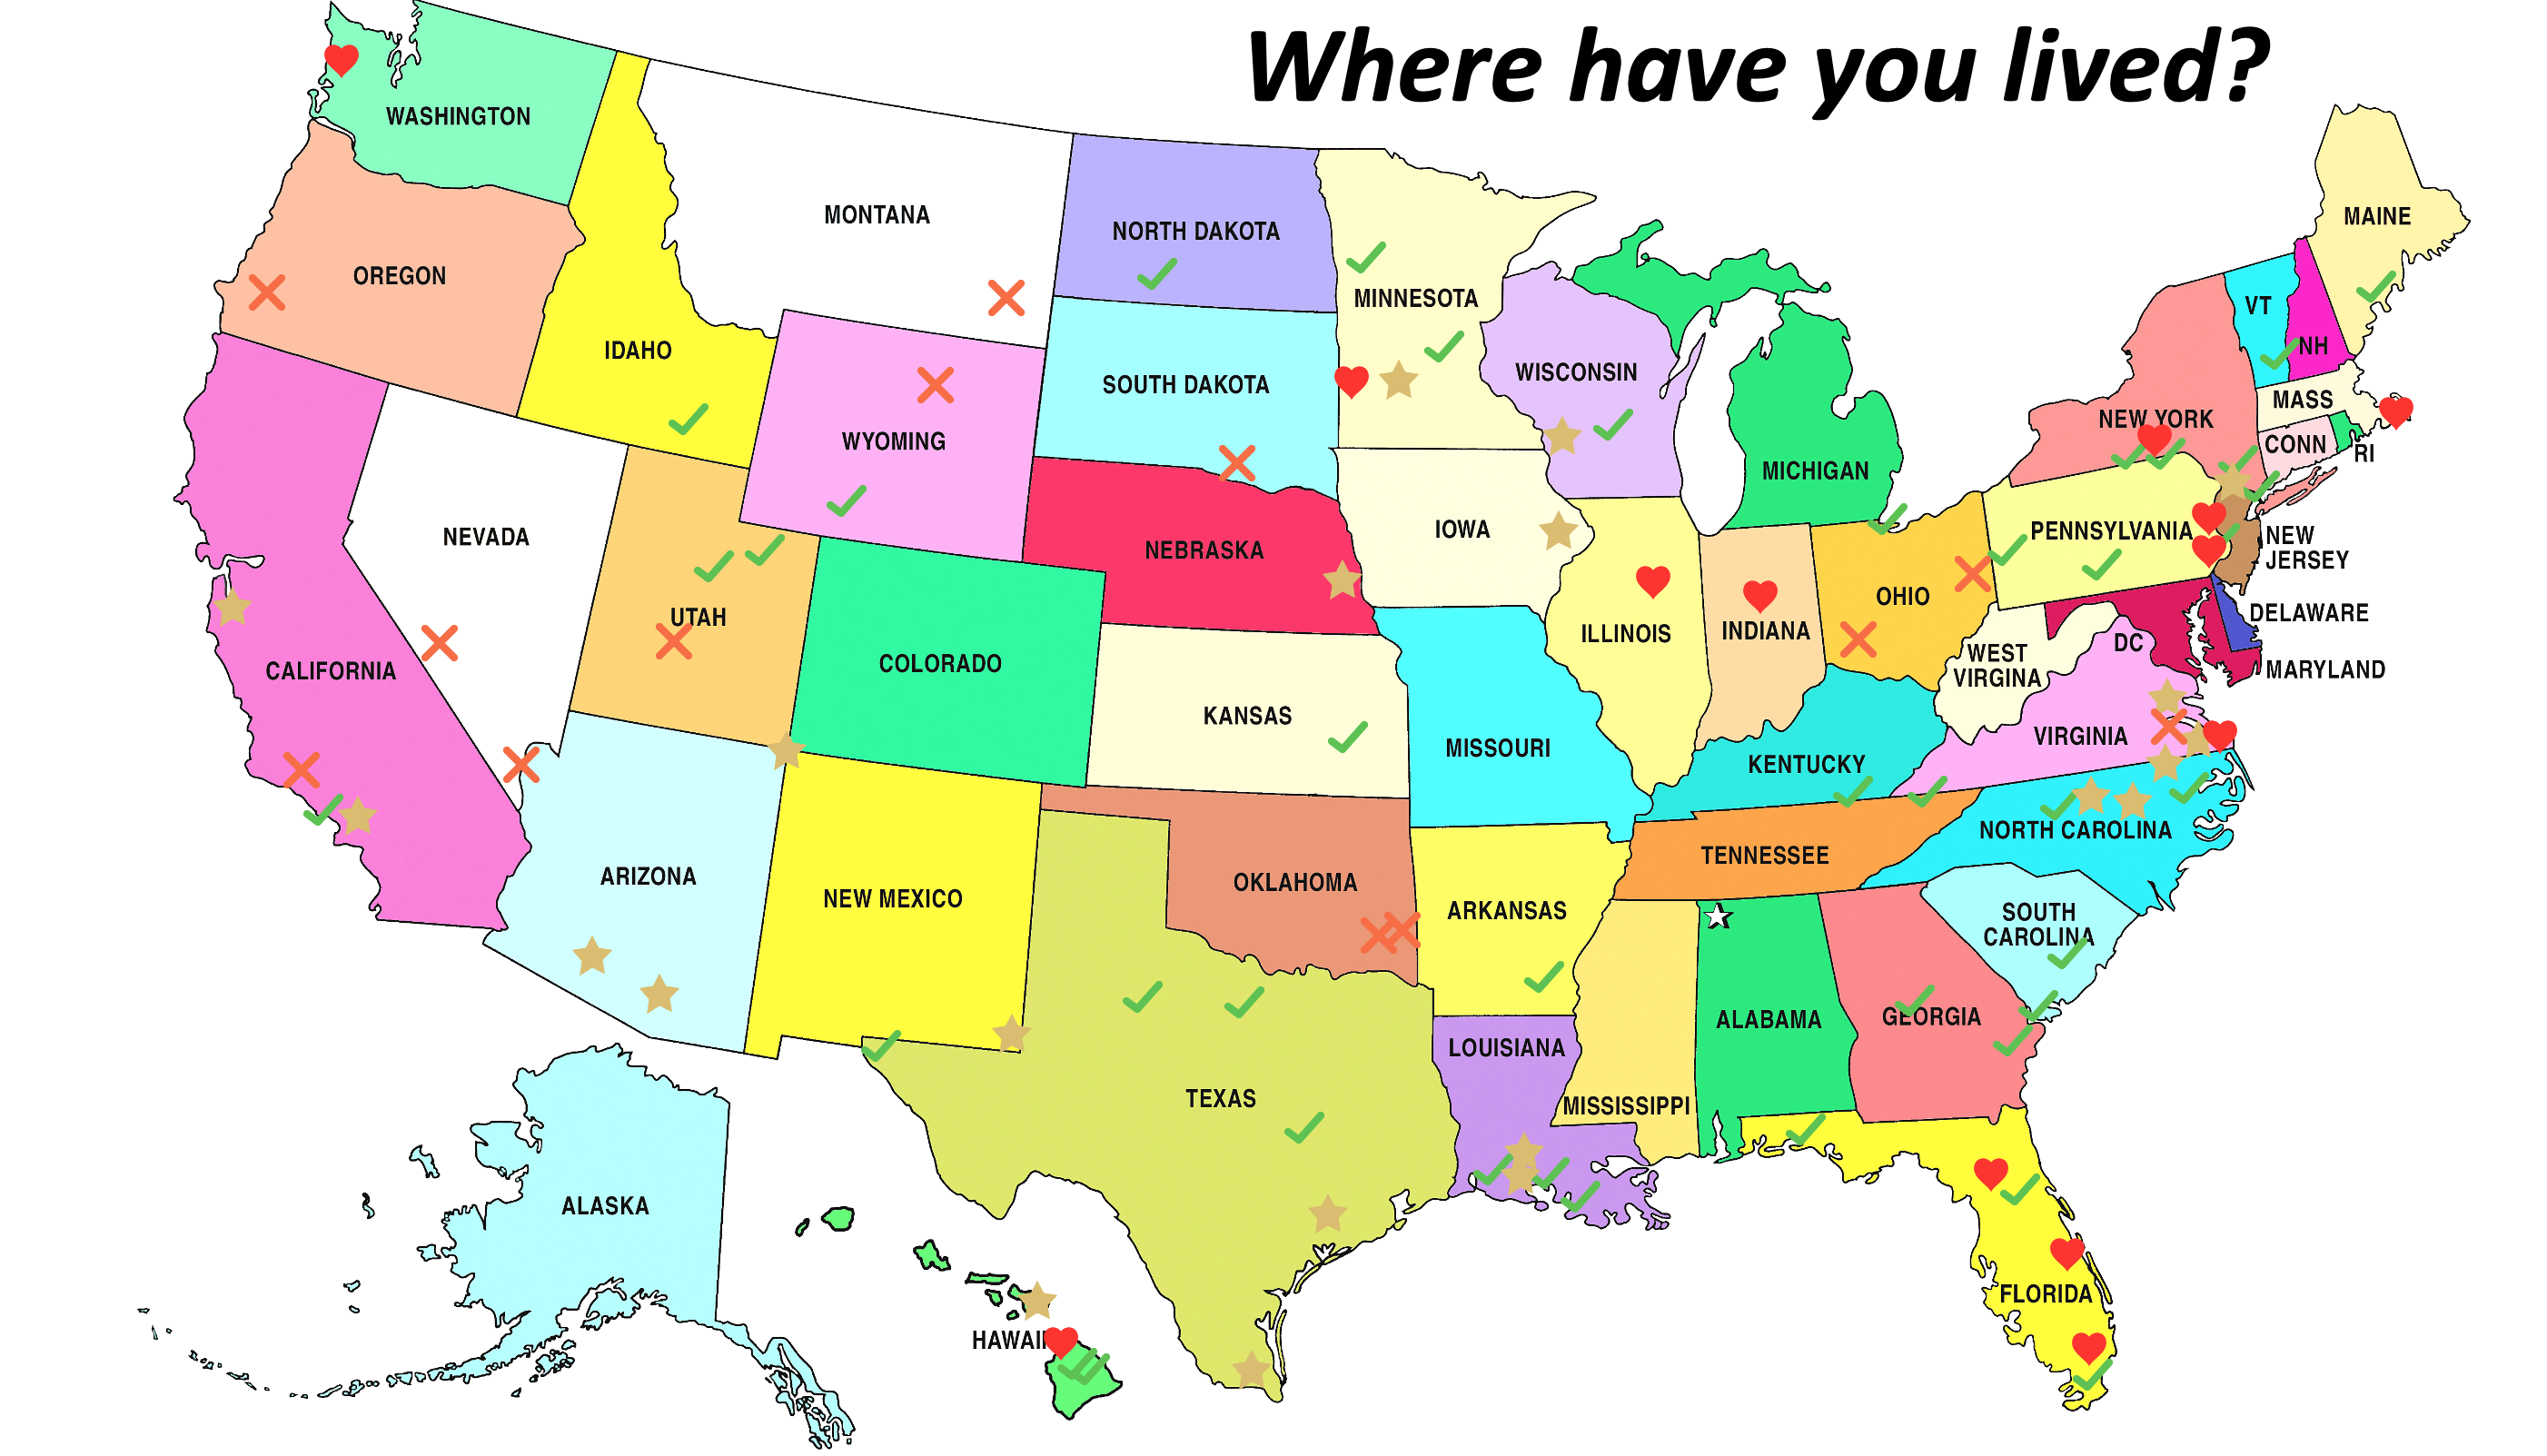
If you share a map on your screen, students can use stamps to mark specific locations on the map. There is limitless potential for the types of prompts that you might give. Below are screenshots from two different ways that a teacher utilized stamps with a map activity.
For the example on the left, the teacher asked students to place a stamp of their choice on the various states that they have visited. For the example on the right, the teacher asked each student to place a green check stamp on one country that they have lived in and a red heart stamp on one country that they would love to visit. Click on a map enlarge it.

Playing Would You Rather
We have previously explored how easy and effective it is to play Would You Rather using Text Annotation Tools. Stamps provide another option. Rather than typing their name on one side of the slide, students indicate their choice by placing a stamp. In the example below, 31 members of a training audience weighed in on which animal would make a better pet.

Visionary Teaching is pleased to offer additional tips to take your game of Would You Rather to the next level as well as multiple slide decks that you can download for free and use with your class.
Collecting Formative Data
You can leverage Zoom’s stamp tool to collect formative data on your students. The best part is that the students will feel like they are playing a game. Figure out what you would like to know and create a slide that will meet your need. In the example below, a teacher asked 19 students to rate their knowledge of the Solar System on a number line. Each student responded by placing a stamp on the number line.
It is important to note that the goal of activities such as this is to get a snapshot of your class as a whole, not response data for individual students. The teacher can look at the responses below and note that the majority of the class rated themselves between 6 and 8, indicating some knowledge of the Solar System. This teacher might adjust the pace of future lessons based on these ratings. It would also be interesting to have students rate themselves after the conclusion of the unit and compare the two data sets.

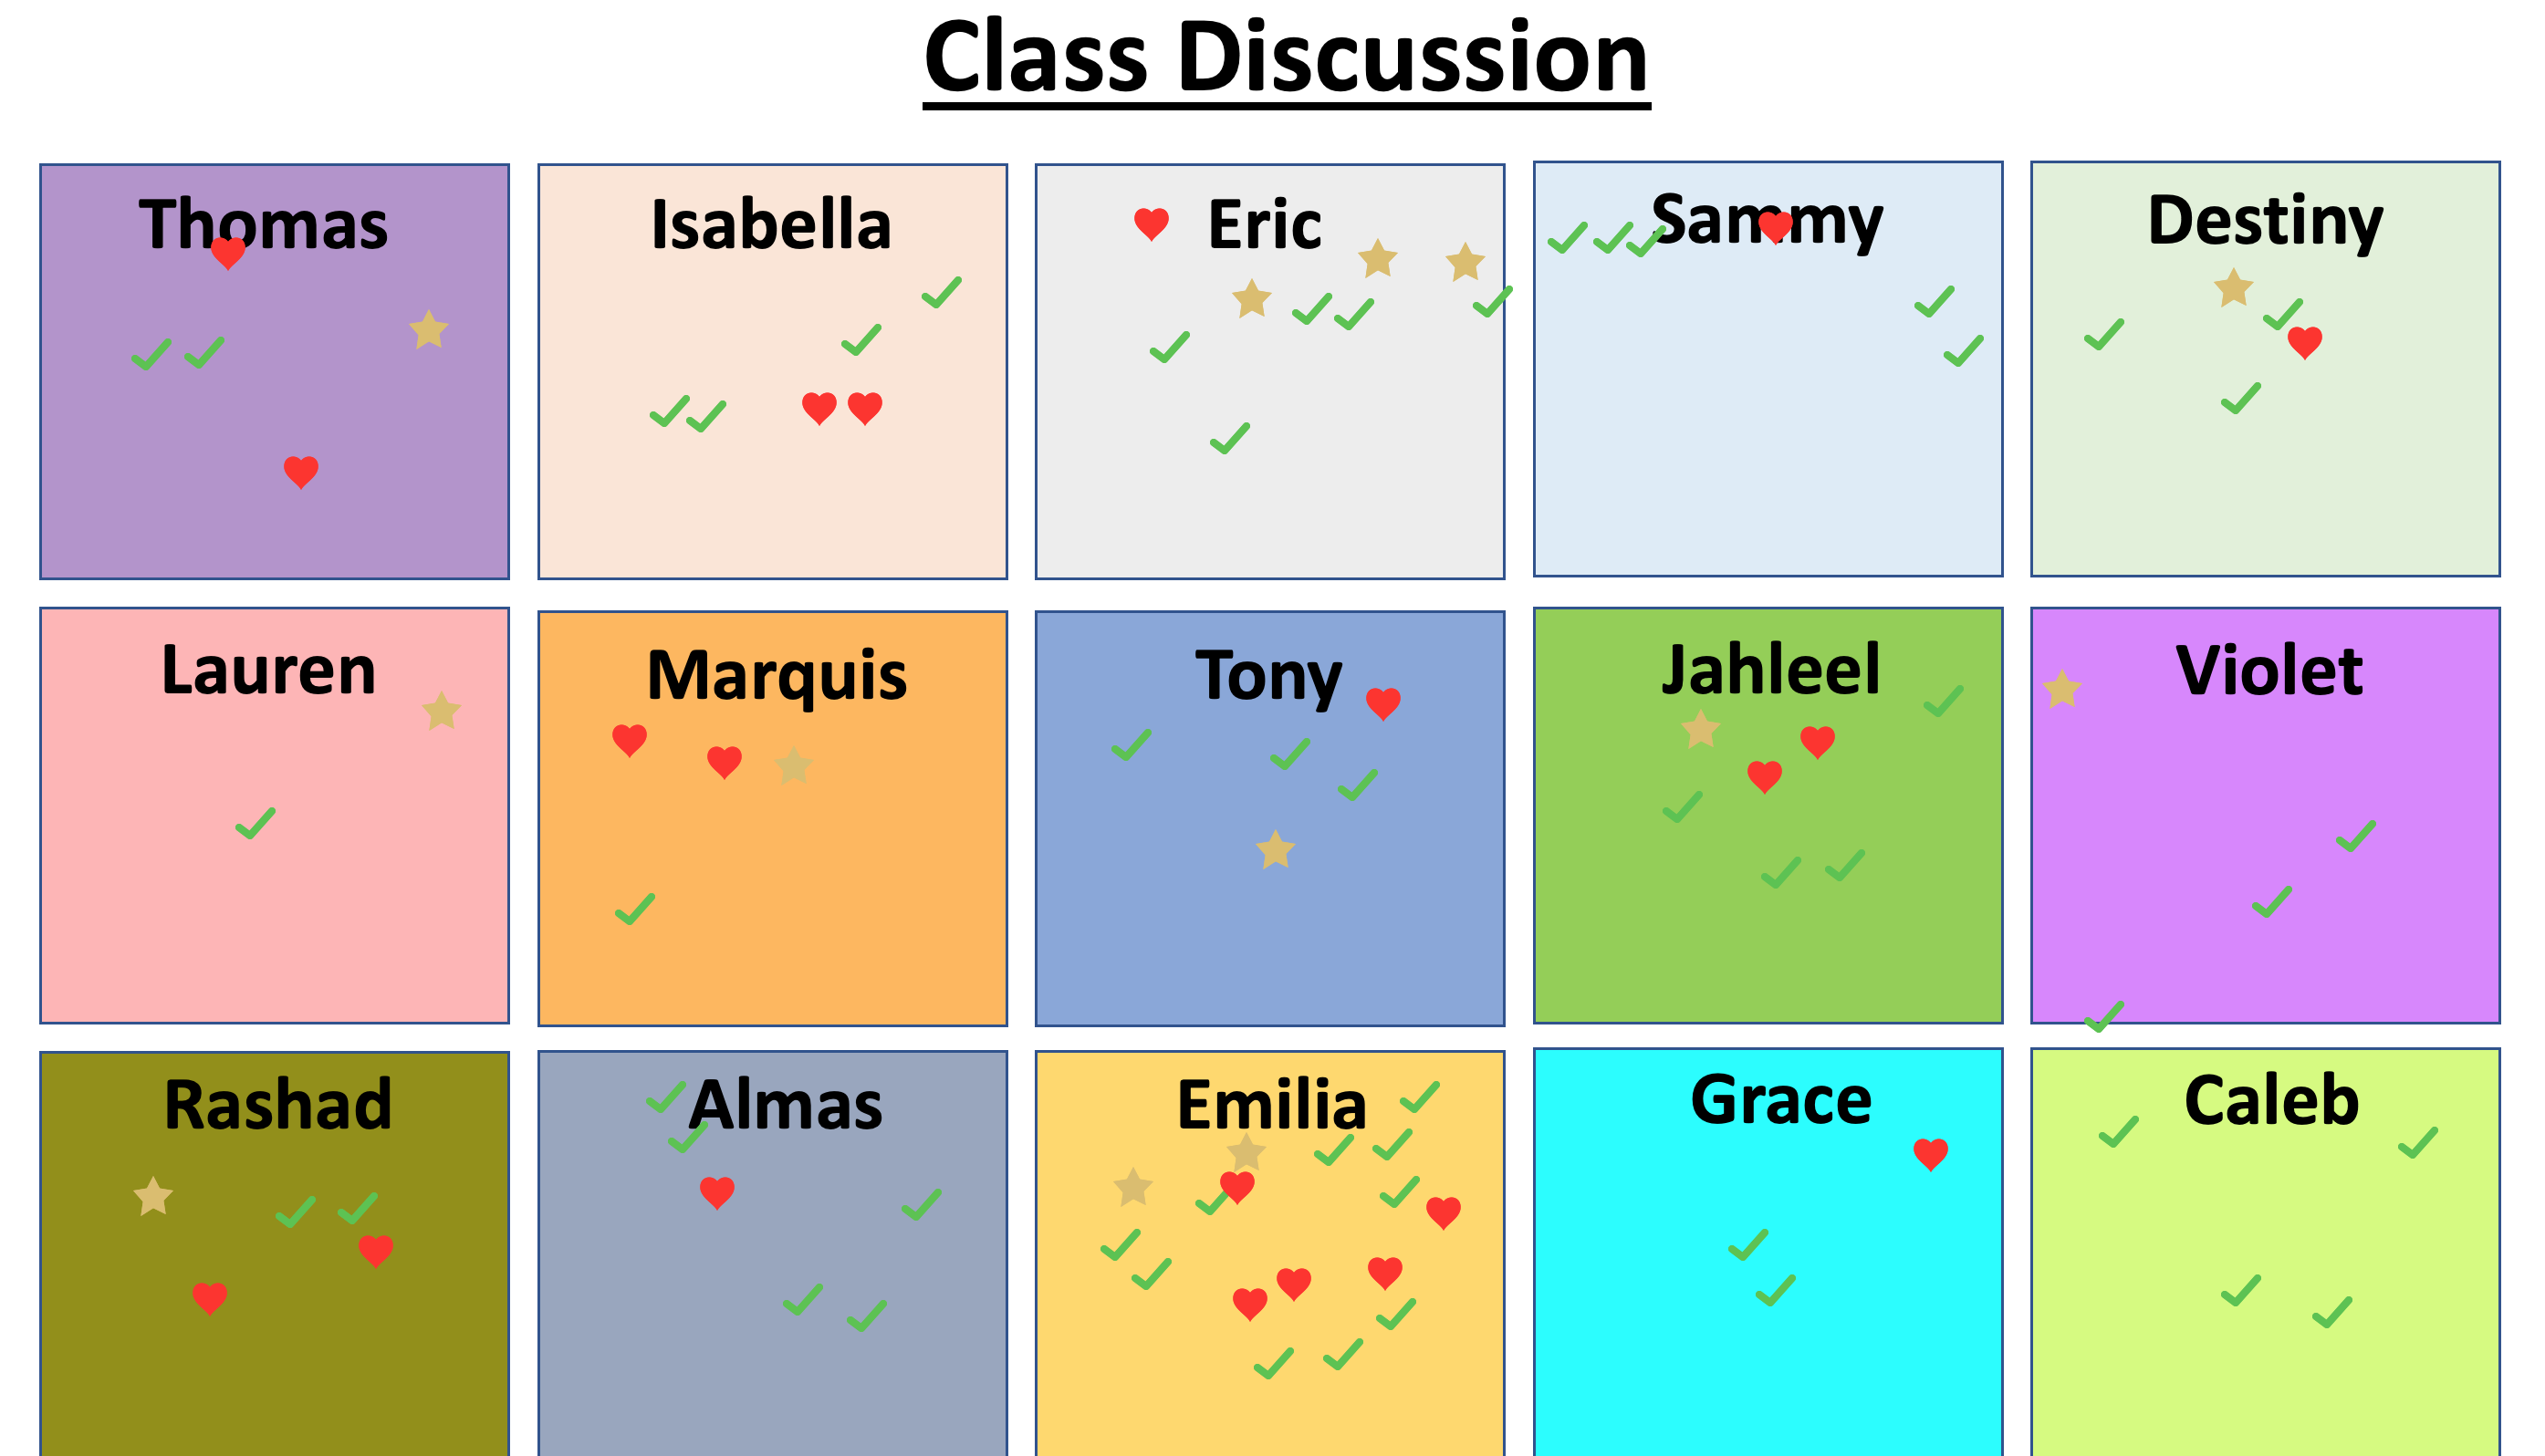
Interacting with Class Discussions
In the example below, the teacher shared a template where each student had a box. Students were asked to listen attentively to peers during a class discussion. They were asked to place a Green Check Stamp in a classmate’s box when that student said something that they agreed with. Students were encouraged to give a Gold Star Stamp to a student who shared a new idea and a Red Heart Stamp when a peer said something that they loved.
This is a great way to keep a large class engaged during class discussions. Each student is actively involved when they are not speaking. Be sure to limit responses to positive observations.
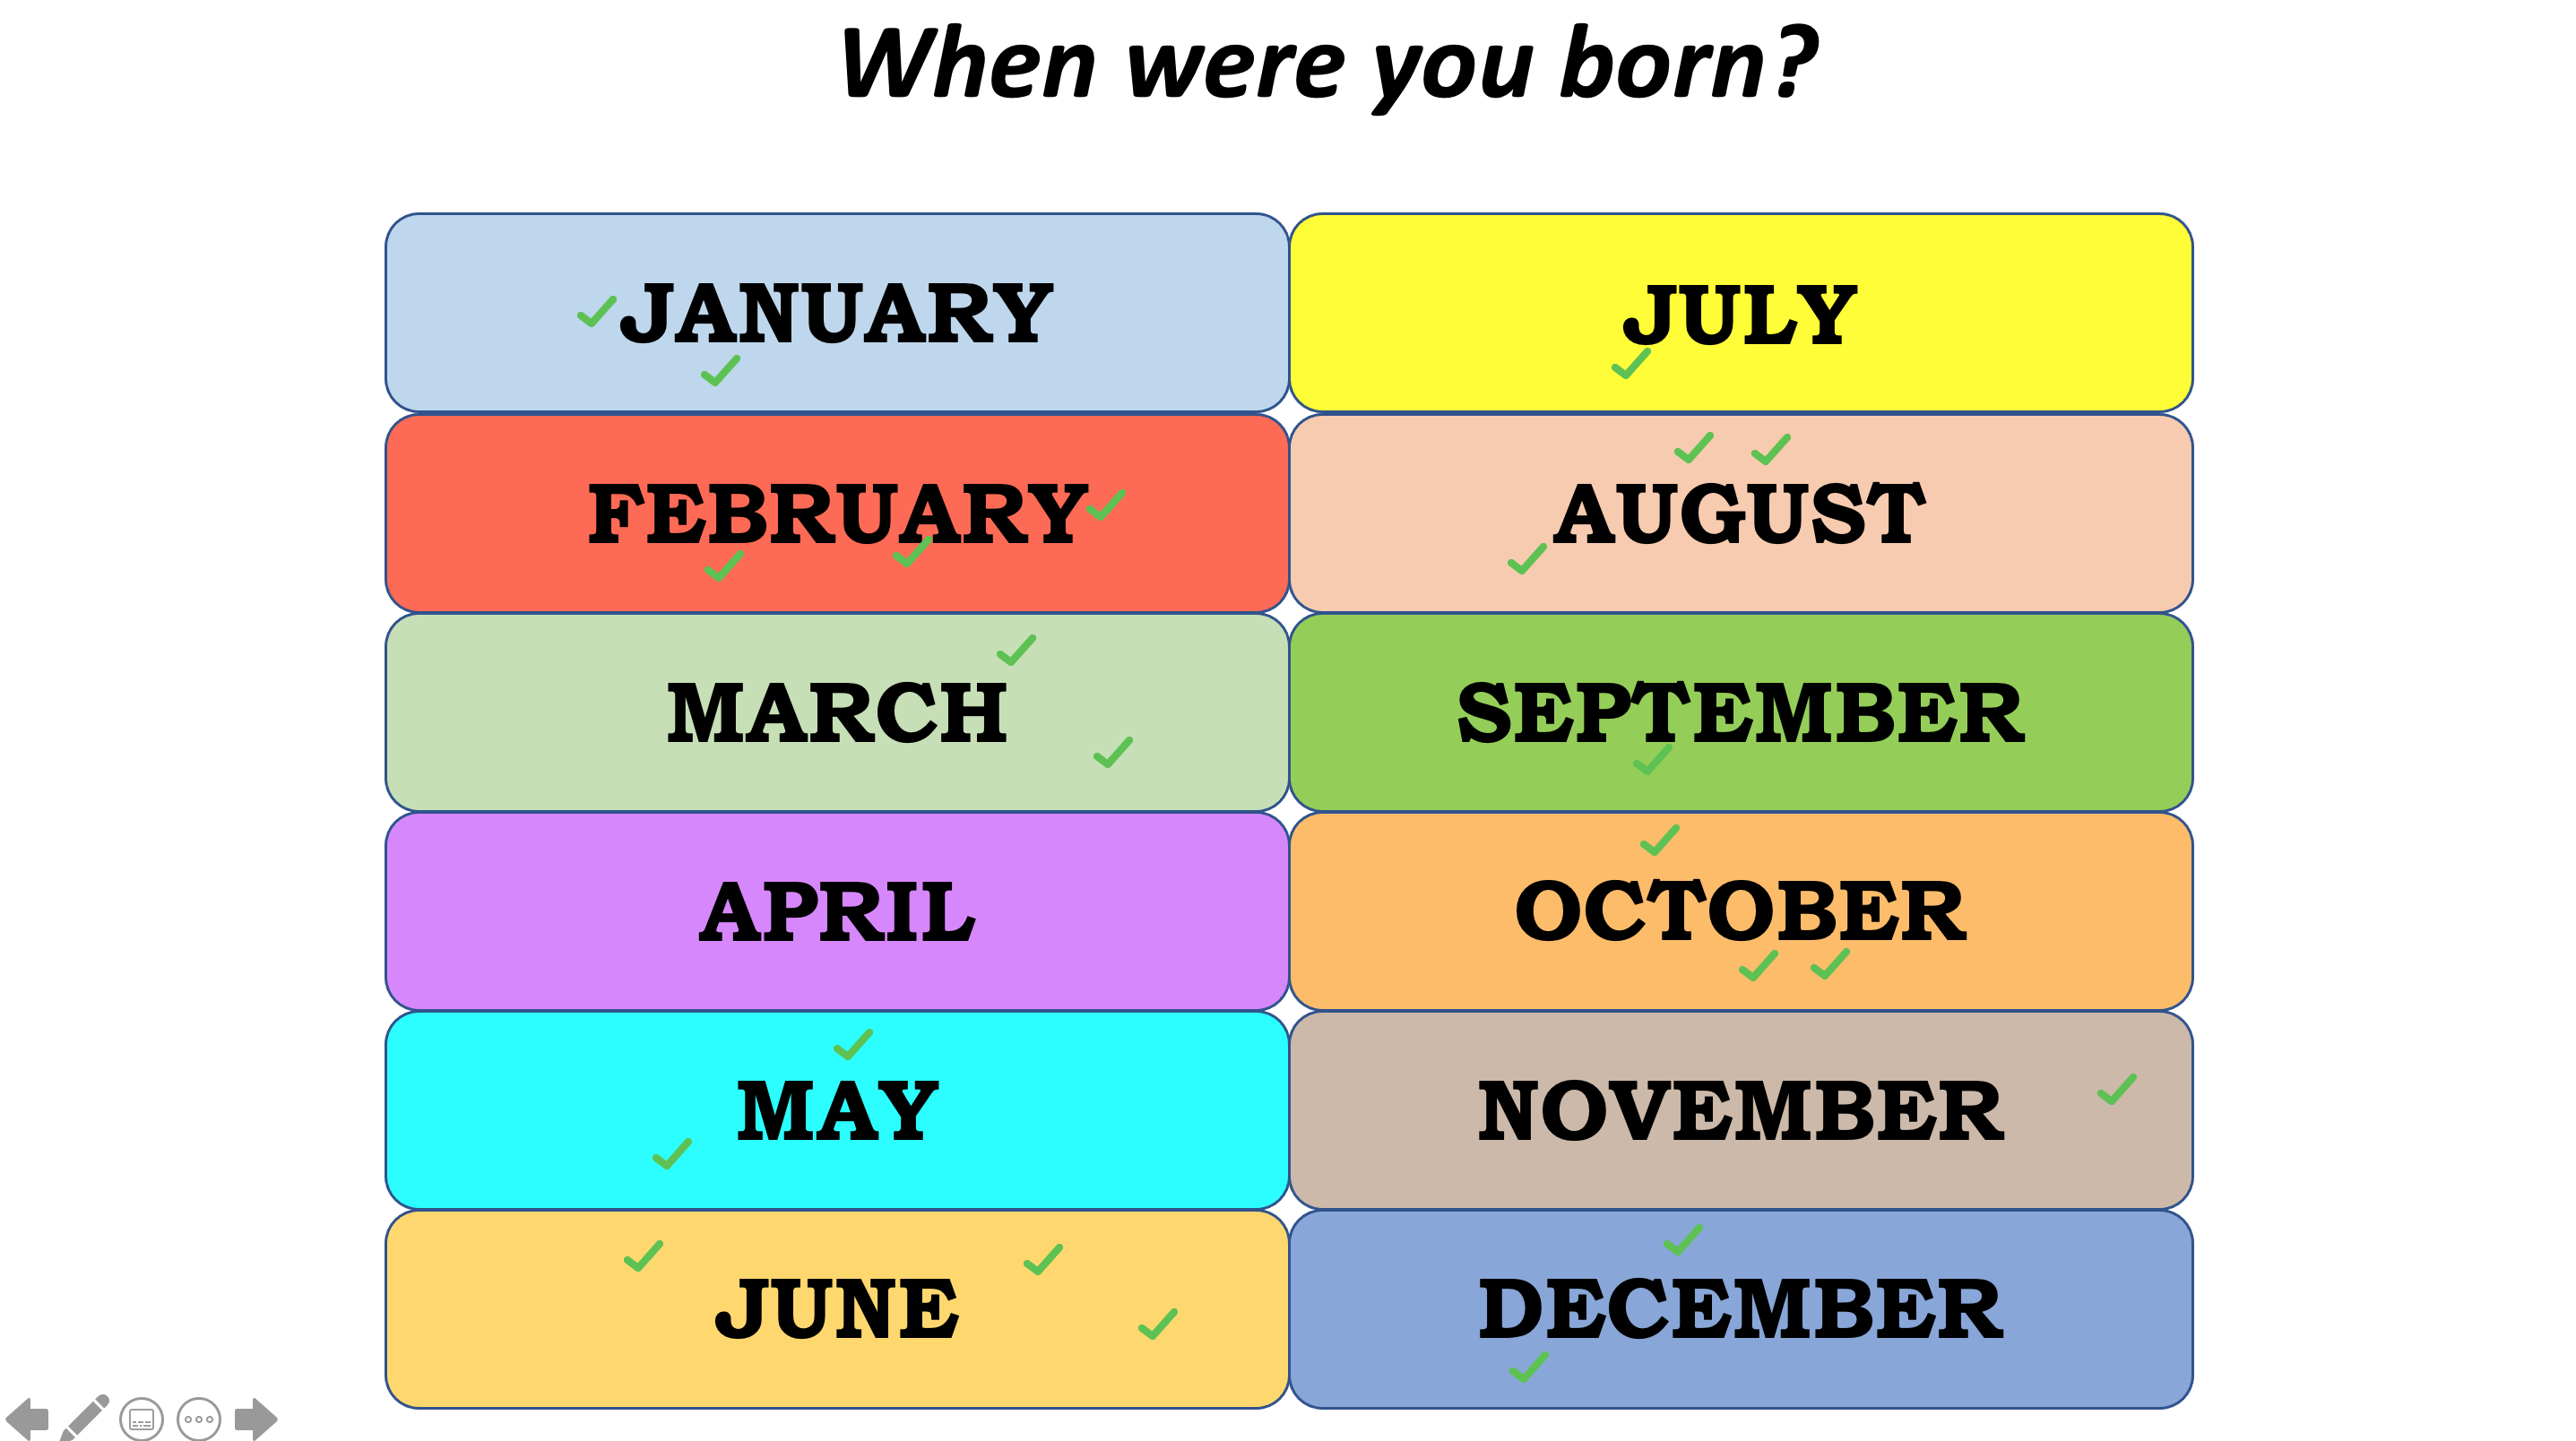
Learning About Your Students
You can use stamp activities to collect information about students. These activities can easily be fit into an “All About Me” unit that is common at the beginning of a school year. In the example below, the teacher asked 23 students to use stamps to indicate their birth month. What other information might you be able to collect with this technique?
Offering Self-Assessment to Students
Students can use stamps to rate themselves or to select an option from a field of choices. In this example, a trainer asked 30 participants to indicate which of the 4 soft skills was their greatest strength. Once again, the entire audience was actively engaged and able to participate at the same time. It is also helpful for everyone to see the results in real time.

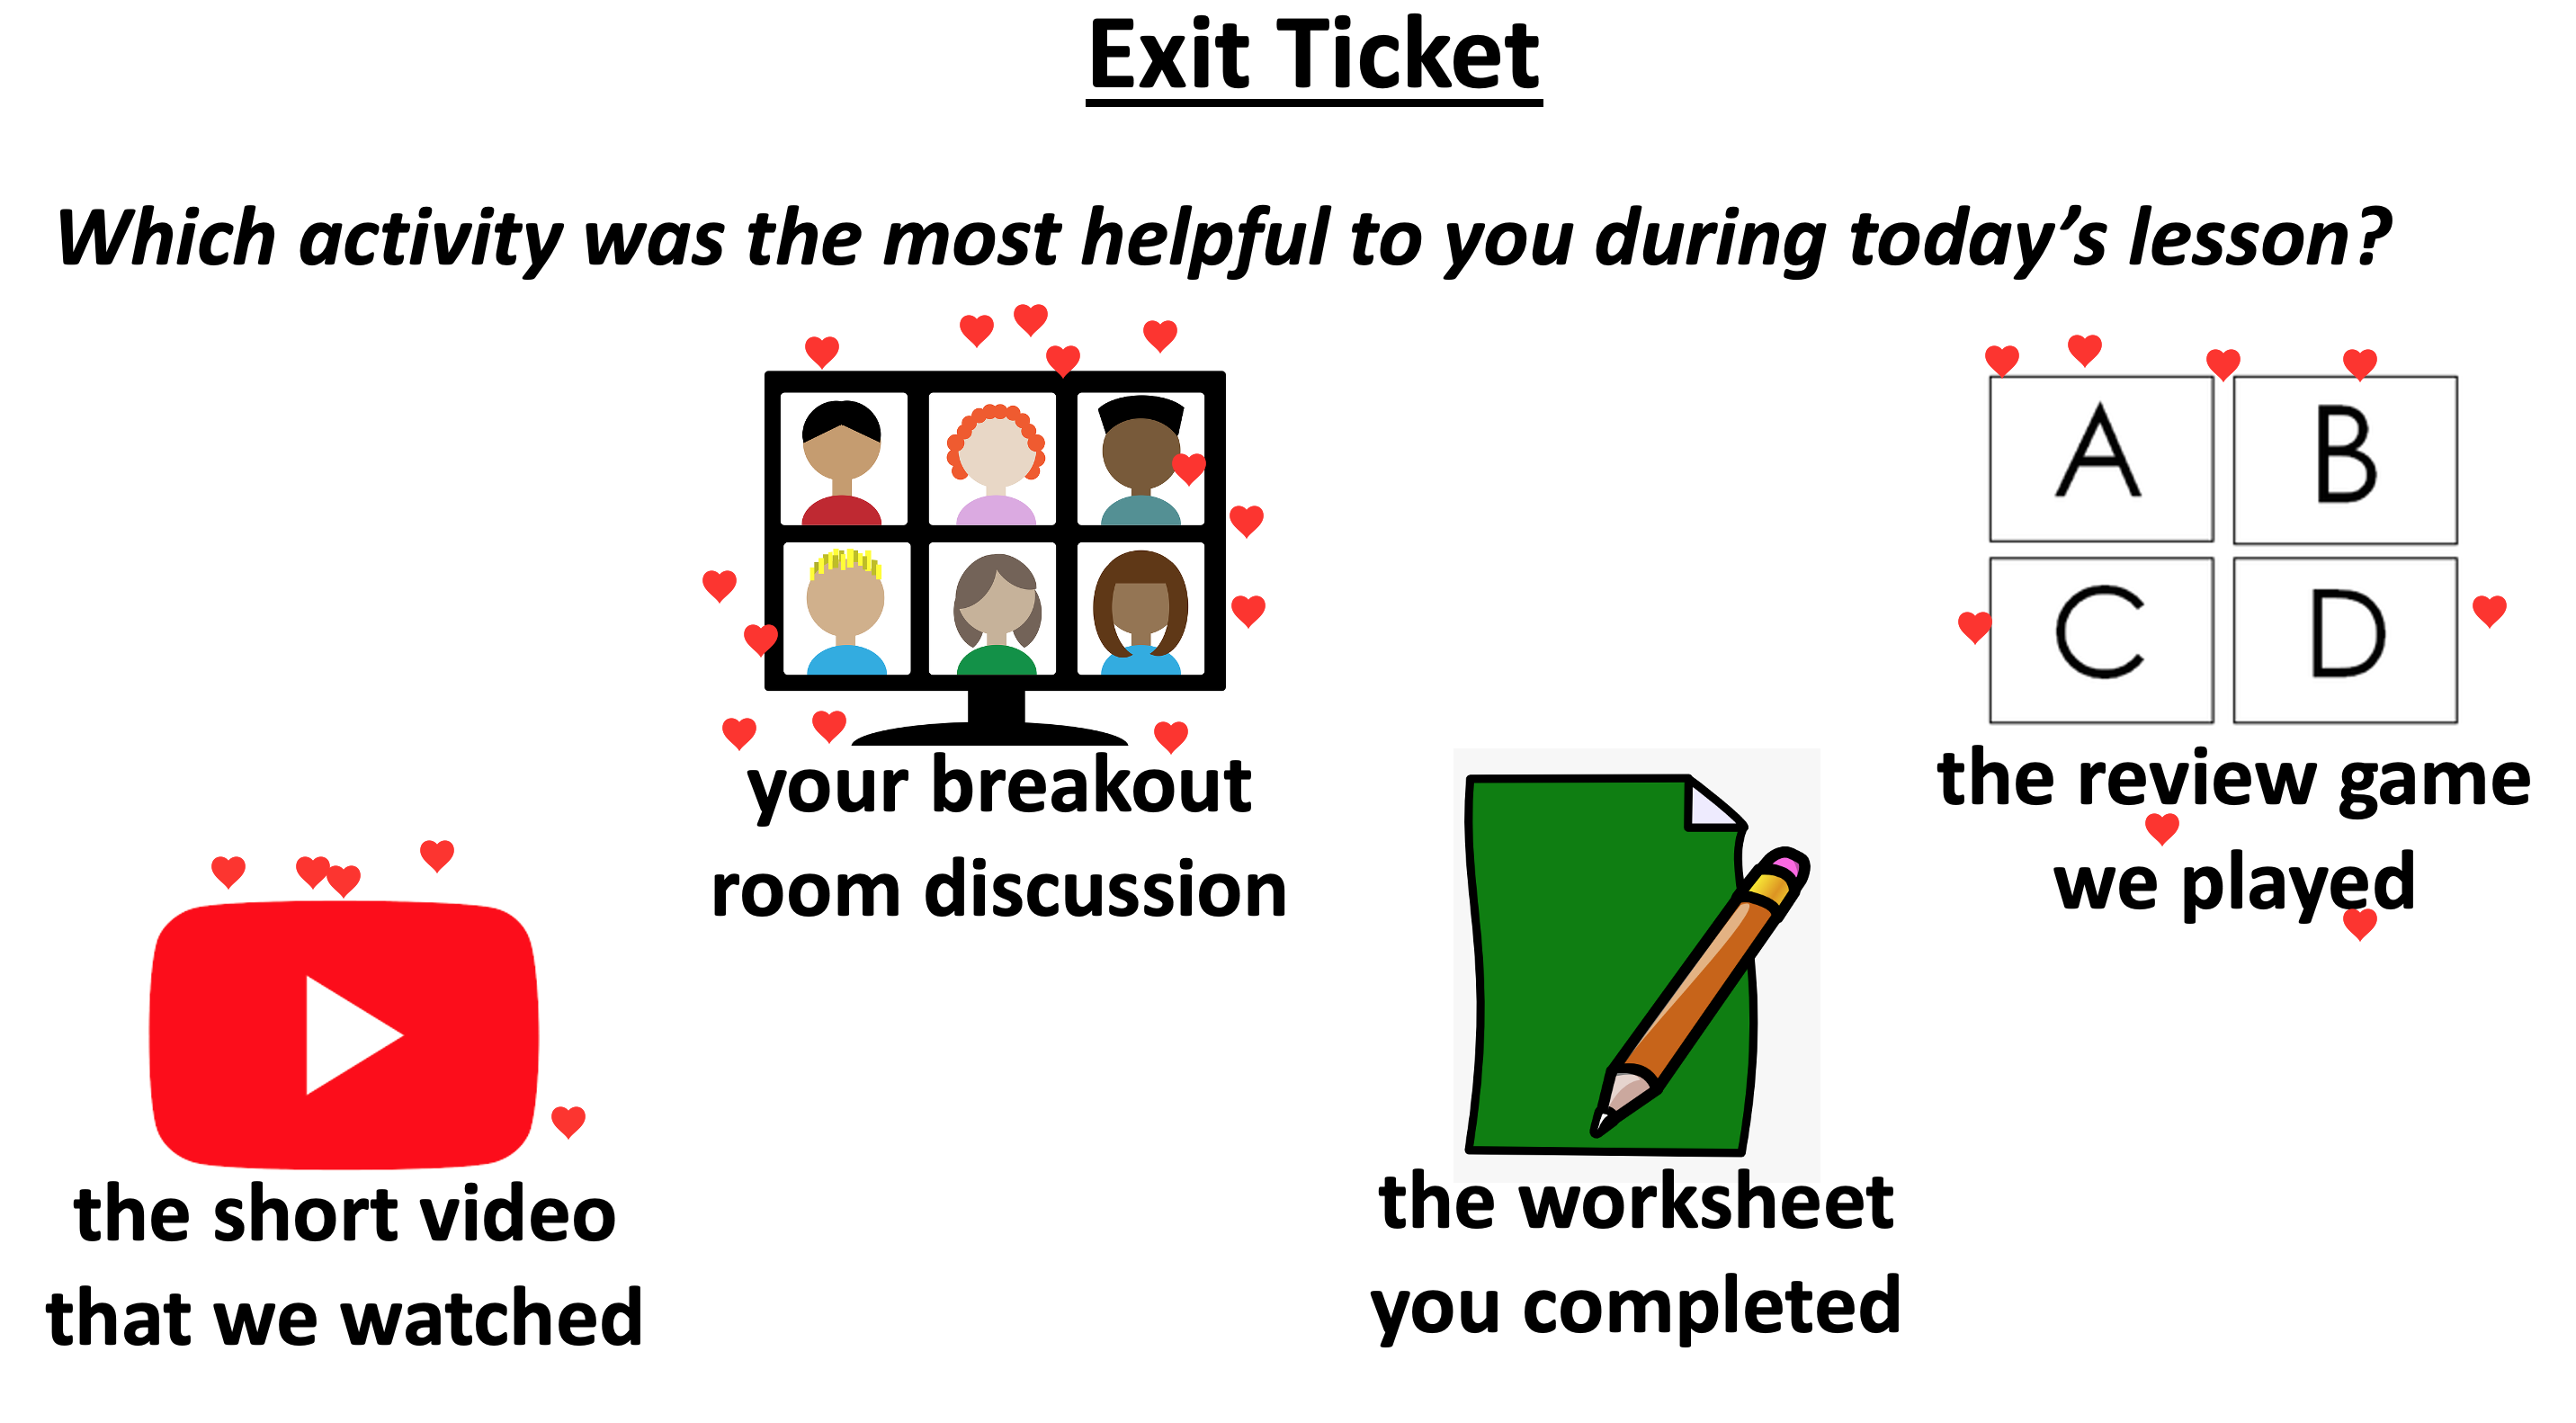
Introducing Exit Tickets
If you are unfamiliar with Exit Tickets, be sure to check out our previous article on the topic. This particular teacher asked each student to use a stamp to indicate which component of that day’s lesson was the most helpful. This is powerful information that can help us understand student learning preferences and apply that knowledge to our future lesson planning.
It is very easy to use stamps to teach, assess, and engage. These are just a few ideas. Explore how you might adapt or apply these techniques for your own instruction.
Happy teaching!